quarta-feira, 24 de agosto de 2016

Mid 16th century hat II

Hi everyone!

Weather wise things are rather unstable here, so are my projects, nevertheless lets carry on with the hat.

On my last post I was working on its "roof".
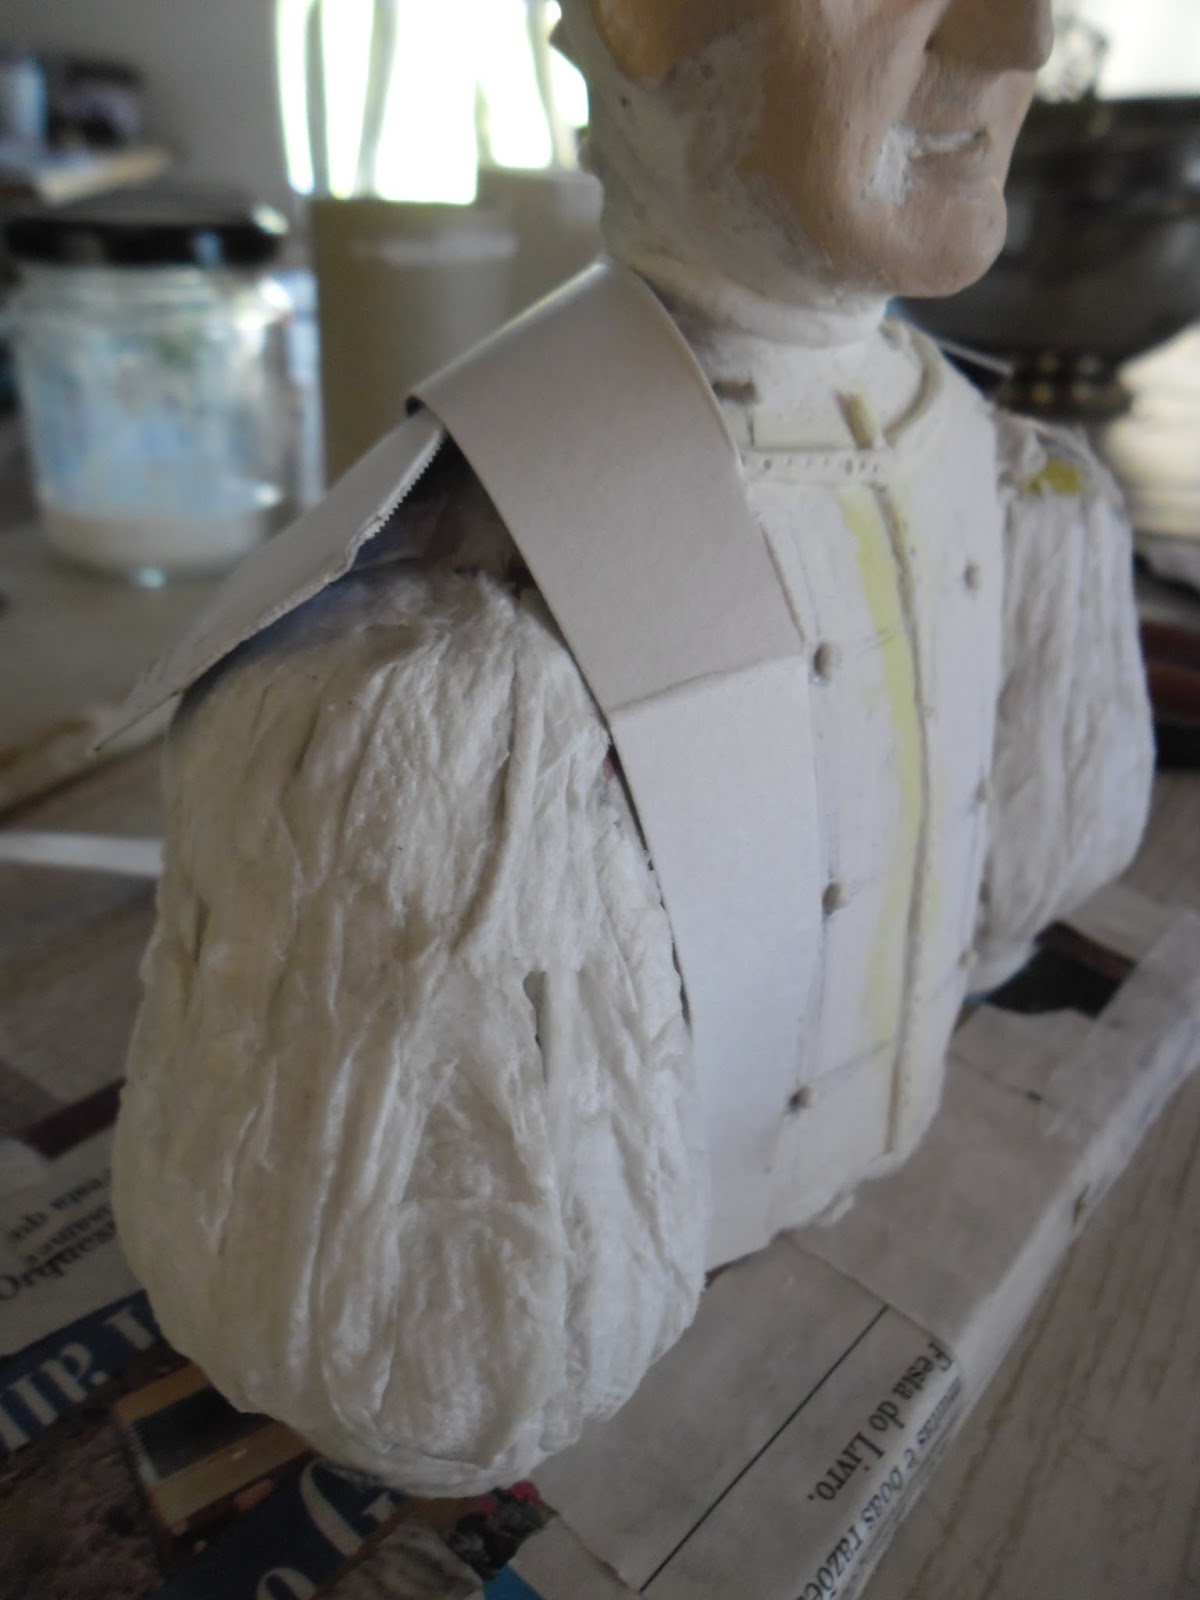
As said before I made a crossed paper strip sort of structure which I covered with little pieces of newspaper and glue. As also said before I wanted to avoid cardboard because of its weight but nevertheless gave a thin layer of paper clay not exactly to make the whole hat heavier but... thought it would help to get some interesting shape? Then covered all with some sheets of toilet paper and glue in order to "seal" the pieces of newspaper (didnt use liquid porcelain this time because I wanted to keep the wrinkly texture from the toilet paper)


During the drying process I noticed that the "roof", due to the paper clay, formed some unwanted shapes, the head wouldn't fit that well anymore but ... "not that well anymore" was still okay with me...
Time to make the sash!  The sash was super simple, just folded an entire sheet of newspaper and glued on the hat. 


Gave a coat of black acrylic colour on the whole piece and a coat of varnish on the sash (thus giving an idea of some silky fabric (I hope!)
Test drive time!


(looks like those from Tom of Finland's art work? LOL!)
Now all seems finished and time to start with jewels and plume as decoration, right? 

Wrong!

I decided that the "roof" was way too mishapen for my taste, so today I grabbed the cutter and made some changes!
Cutted off the part of my dislike and with cereal box cardboard (two sheets of it glued together and then all covered with pieces of newspaper and glue on both sides) I re-made the cutted bit and re-glued.
Now once after I cover both pieces on the inside the hat and give another coat of paint, yes, it will be time for decorations!!!

Ah (!) in the meantime, another doll making adventure, King D. João III (remember him? posted his photo on the last post!)!
Thanks for visiting! Do tell your friends to do so too! :P


sexta-feira, 19 de agosto de 2016

Mid 16th century hat

Hi everyone!

Yes, you read it right, MID 16th century hat!
Of course that the idea was there way before finishing the late 16th century one, but as I only have two hands... ;)
 The inspiration came partially from the early french Valois kings (from Henri II to his sons François II and Charles IX (Henri III sometimes also wears them but on early portraits), paintings by François Clouet and also images of "my" own Kings, namely, D. João III and D. Sebastião
D. João III King of Portugal
Henri II King of France
Charles IX King of France
Based upon experience, this time I wanted to avoid cardboard because it gets rather heavy afterwards. Plus, the idea upon the "how to" had been fermenting on my mind already a while ago so it was only a question of start doing it!

For the first time, hat wise, I took my friend - the bust - measured its head and with thick paper (80grams) made a sort of headband. On this headband, all around it, I glued little strips of the same paper.
Looks like the Staue of Liberty, right? Lol!
Now the idea was to make two similar brims, one for below and another for the top. For this thought of cutting some strips of newspaper slightly rounded in order to go along with the headband format.
Glued some on the lower brim and had a look at the mirror to see how it looked (yeah, sure!)


The same procedure on the top, ending with something like this

Using the upper brim as border to make the "roof", I glued some crossed strips of that same thick paper.
Then it will be only a question of covering all these crossed "paths" with pieces of newspaper glued in layers and see whats next!
Already looks like a crown, awwwww!
Stay tunned for there will be more!

Thank you :)


terça-feira, 16 de agosto de 2016

Paper mache Horse making!

Hi everyone!

Now that I've introduced you to my other site - myroyaldols.wix.com/myroyaldolls - today's post will be about horse making as I'm planning to make an equestrian portrait of a very special king.

The portrayed this time will be King D. Sebastião. For many reasons, for me, he is the Golden Boy of Portuguese History so I want to represent him whilst empowered by its earthly and divine "right" to rule, thus mounted on a horse symbol of power and strength.

 For the doll I will use a head from a sketched doll I tried somewhile ago, but wont go further before the horse is finished.

Horse wise I had made one some months ago in order to make another equestrian portrait doll (of D. João VI inspired on the famous paiting by Domingos Sequeira) but ...
The body was finished and was waiting for legs and some other features.
In the meantime it was hanging here and there for far too long until I thought about making a cast of it in order to be able to make more more and more!

Horses have been always an adventure. The first one I made was .. too long to remember the materials actually, I do remember that the dolls though were made out of a structure of wire wrapped on foam and then dressed according to its epoch. In his case, Portuguese King D. Afonso V and his horse have armors made out of coke cola cans which, with time, all rusted and after some years (and because one of the horse's legs was broken (and I was fed up with the whole thing) putted it on the garbage. This sculpture was probably from 2009 or 2010...

The second horse I made was much later, last year in fact! Structure wise was made as I made the one I'll be showing you soon, the "skin" was papercrete (paper + concrete) and rearranged with toilet paper (the figure was done according the same procedures as I told you a post ago).
It portrays Portuguese King D. João IV (wish I'd have better photographer skills!)
 Now the recent one.
The only photo I have of it it was taken after demolding the halves
 So my horse "recipe" would be to use 2 balls for the chest and the dérriere + 2 cilinders of cardbox to link both and the neck and the head was a "modeled" toilet paper roll.
This one is covered with my recipe of paper clay (search its post on this blog!)

The rest was wrapping both halves in tin foil and spray the expandable foam on top! Voilá!


Now the casts were ready, time for the dificult part.
For the dificult part I decided to soak some sheets of paper and "smear" them inside, then, whilst still wet, gave some coats of little strips of paper soaked in glue. It worked!!!

The result that came out from the casts looked clumsy not to say shitty but with patience I was able to reassemble all and even glue both halves in order to obtain a... horse!

As I want a very specific pose, even after the horse was assembled fine, I made some cuts in order to define positions. I want him to stand and whilst working on this I've covered some bits of paper clay and this is how far things are at the moment
 Thanks for visiting!


sábado, 13 de agosto de 2016

The importance of paper on MyRoyalDolls project

Hi everyone!

For all of you that alreay know my historical dolls project and for those who dont yet, I'd like to share with you a bit of my doll construction process.

Its been a long process on the making, diferent aproaches, diferent materials but now - maybe since 2 years by now - I've been totally devoted to paper mache.

Everything starts with these:
On the left there is two casts one for heads and the other for torsos - made these out of silicone ages ago when I was still using clay to make the dolls; on the right there's the result after filling the casts with strips of paper and white glue (yeap, the back of the head is actually another face, eh eh eh.

First of all I only do the whole head when the facial features are either finished or almost because depending on the epoch of the portrayed, sometimes there are two little things that need to be included (and annoying to sculpt) ears which are only made when both parts of the head (front and back) are assembled thus giving me more the sense of space. Mind you that for faces or hands in general I dont use paper mache, I use air drying modeling clay.

What I also use lots for filling spaces or modeling bodies is toilet paper. Either balls or rolls, it depends on the shape I want, the time and my patience.

Can't put photos of its beginings because when I started the following bust I wasn´t dreaming about blogging and posting, etc, but ... lets have a look eitherway!

So on this chap there's the head mostly finished (with ears!!), half of the torso slightly modeled with toilet paper. By now I was working on the arms. Because he's from the Renaissance period and his clothes have those puffed sleeves I thought that half a kinder surprise egg would do the primary trick (thats, for me, one of the funs with paper mache, in order to achieve a specific shape, anything goes for casts, right?).


As for the lower part of the sleeve too, just added some more paper in between the halves because of the arms length.

Again for the volume of his cloak used toilet paper.


Whilst the back is drying, its time to work on the sleeves. (In the meantime I had covered his chest area with air drying modeling paste because as he would be wearing a brigandine I wanted a smooth surface).
As for again the sleeves I used two rolls of toilet paper on its base and the rest upwards which resulted quite well I must admit! Good old fluffy Renaissance sleeves! :))


As to adjust the figure's base its time to build a... base! And these are extremely easy, just two pieces of cardboard glued together by small strips of newspaper (it was by doing such that I "found" the way to make my so called "paper mache canvas" (do search the post about them!))

 To represent the cloak's sort of collar I used cereal box cardboard for its "skeleton" and then added air drying modeling paste (because I was restless to finish this bit) and some toilet paper for the texture.


So ... after the figure's adjustment on its base, I cover it with liquid cold porcelain, its creates a bit more of stability and hardens the whole paper... thing.

Painting is often fun, I tend to give special care on the faces, specially the eyes - after painting them it feels as if the portrayed came back o life "Hi, welcome back Sir / Madame!"!
For beards and hair I use small toilet paper roll pieces which are glued onto the figure baring in mind its intended epoch. Then are painted whilst the paper is still moist.

The final touch is a coat of varnish!

By now you want to see the final result and, surely, know who the "chap" is, right? So I invite you to visit him and the rest of the sculpture collection at http://myroyaldolls.wixsite.com/myroyaldolls!

Could you find him? Let me know!

Thanks for visiting! :)

quinta-feira, 11 de agosto de 2016

Paper mustache!

Hi everyone!

Today I'm posting something that I did yesterday, finished today but planned ages ago!

Have a look ;)


I love it so much that in the end I'm afraid I will have to glue some acetate (thats what I wanted to say on the video but forgot or didnt thought that would be so similar to Portuguese) piece behind because if I wear it lots the glue will eventually melt from the skin heat...!

Thanks for watching and following / subscribing!

segunda-feira, 8 de agosto de 2016

Late sixteenth century paper mache hat VI - FINISHED!

 Hi everyone!

 Yeap, the hat is finished, yey!!!
 On my last post everything within the hat was done except painting the sash's pompon, under the brim and varnishing the paper "embroidered" roses.

 After taking care of those, the jewels making was another adventure! 
Plume wise I first thought upon a fluffy sort of geiser surrounded by other coloured ones falling down around it but after trying it was more "better not". This... "geiser" as you can see is a simple sheet of printed paper which was hand cutted as a sort of spaghetti glued unto a piece of wire which, on its edge, has a fake plastic pearl with some balls of toilet paper that were gilded with metalic paint, and some glued plastic "diamonds" .
 Thought on painting the sheet of paper in white but then also thought it would look "cool" if I'd allow the whatever printed text to appear (actually is the monthly balance letter from my bank account, LOL!

  Wondering upon putting a jewel hanging from the geiser's middle, I've created a sort of ring on the middle (which also helps to sustain the overall pompon effect). This ring is a simple strip of cereal cardboard box to which I glued some toilet paper for the rough effect and also some plastic pearls and diamonds.

 For the jewel on the sash I thought upon a brooch and the ones from the Tudor epoch were for sure an inpiration!
  Since a so called "spiritual awakening" 5 years ago, I connect very well with crystals (also do crystal healing therapies by the way) and whenever I want to change something I "ask" and keep a piece of malachite crystal with me (normally works! Try!), so I thought upon representing malachite on the set of the jewels on the hat. Basically the malachite was modeled in toilet paper, covered with air drying modeling paste and then glued on a piece of cereal cardboard box. I wanted to represent a cameo inside but didnt managed... The rest is easy to see, glued plastic diamonds and pearls.:)

  The second piece within the hat jewel is a boat.
 A boat is a symbol of voyage, departure from old things to new things and thus represented in malachite crystal. Had a look upon some authentic late 16th century boat jewels photos and saw that some have the body of the hull made from a big pearl (so often amongst pieces of jewelry at that time!) thus I thought upon representing it with a chunk of expandable foam as in the end it can  resemble mother of pearl (well, almost!) but as the brooch had the malachite and its such a dear crystal to me I went back on my decision.
Again basically the hull is made out of a quarter of a circular shape covered with liquid porcelain and then simply painted black with a randomly applied coat of green, the mast is newspaper roll covered also with the same, the "things" on the edges are cereal cardboard box, the dove is a mix between air drying modeling paste and toilet paper, the sail is cereal cardboard box painted with some pearlish nail polish and... the rest, again, are plastic pearls and diamonds.

  Originally that's how I planned the jewels set but in the middle of the way, as I wrote before, thought upon being extravagant and placing the boat on the middle of the "geiser" plume, but then ended up by doing a sort of hook out of wire and now I can attach/detach both pieces.


It was only in the end of the end that I noticed that... the boat's front is pointing back! As the hat was conceived with a specific direction and I cant change nothing I'll just accept that as a sign of something, a sign that I either will "travel"  BACK through history everytime I'll put the hat or it means that soon enough I'll have to do another boat (or something else (a hat pendant jewel set collection to change according my moods! LOL!!))

 Well, voilá!

 I must say that I quite like the finished result (although the construction of the hat itself was a bit too medieval if not pre historic)!
The panache (plume) looks somewhat exotic, easily takes me to those days after the Portuguese discoveries and all was so full of excitment, exotism, splendour, colour ... !

After such adventure I'd really love to hear from you! Please comment, like, share and/or subscribe if you like my works. :)

 Thanks for visiting!

terça-feira, 2 de agosto de 2016

Do you like cakes? Paper mache "pastel de nata"

Hi everyone!

If you ever been in Portugal or Lisbon for sure you know what "pastel de nata" or "pastel de belem" are, right?

If not, allow me to take you on a small history voyage:
In 1820s there was a revolution between liberals and non liberals, liberals won and one of the measure was to abolish religion not only from the state but also from public life. Under that law all the convents and monasteries were closed. In order to survive many monks and nuns sold their ancient recipes of all their famous pasteries.
That was exactly what happend to the hieronymite monks who lived in the now called "Mosteiro dos Jerónimos"  near the Tagus river in Belém, Lisbon. They started to sell these egg tart pasteries in order to survive until they ended up by selling the recipe to a nearby sugar refinery which ended by opening the shop where one can buy them still today!

There are "pastel de belem" but there are also "pastel de nata". Some people think they are both the same but they taste different, the secret within the recipe of the first ones no one knows, but... I honestly prefer pastel de nata (these are sold almost everywhere, even in China!).

As I wasnt sure of the result I didnt took photos of the process but it was extremely simple. Just filled those tin cake "things" with strips of newspaper and glue, added toilet paper roll to make the pastry's edge and for the egg cream I filled it again with toilet paper and glue. For the final touch I covered all with liquid cold porcelain, played around with some pale acrylic browns and yellows and gave a thin coat of varnish on the cream to give some realism to it. Voilá!


Yummmi!!!

Curiously enough when we went out for breakfast today and I took this latest oeuvre to be shown to the patisserie owners (Patisserie/restaurant MOURISCA in S. Pedro de Sintra (by the way)) they liked it so much that asked me some to decorate their front window! Cool!!!

In the meantime I've aploaded the "pastel de nata" to artfinder priced 20€, but if you also have a patisserie that you'd like to decorate (with either these or others cakes), or just like cakes, you can buy directly from me if you prefer, just tell how many and wich size you'd like (this one is around 6cm x 3cm)!

Thanks for visiting!


segunda-feira, 1 de agosto de 2016

Paper mache, casts and expandable foam

Hi everyone!

Some days (weeks?) was thinking upon making a bust of myself in order to use as manequin for some things I'd like to try and thought first to make it with plaster gauze strips and then fill it also with the same material plus some layers of paper and more plaster gauze strips hoping that would become stronger.
With time I just remembered that had thought, many many months ago, about some material that I could use as filling, something not that fragile and light at the same time. Used to see my father working on house restorings thought about expandable foam! Wow, such a nice material! and extremely cheap!!!
After a few searchings online expandable foam and I became best friends!

This post isnt about the bust (not yet) but about some casts I started to make from the fruits I've been building up until now (like the apple for example).

Building the fruits, like I wrote before, is extremely interesting because one end up by really having to look at them in order to understand their shapes. Time wise can be consuming and plus I live in a rather humid environment. But the idea would be to be able to construct as many different fruits as possible in order to to make foam cast in order to easily reproduce them as much as possible.

Today we went into what we call "chinese shop" which basically its like a 1£ shop and they have almost anything, all "made in china", all rather cheap (okay, for local economy is shitty but for locals without much much money is ideal (thus their empire here (dont know if other countries in europe have the same))) and to my surprise (or shock) found some plastic fruits that could easily substitute all the work I've been doing, constructing the fruit in paper clay, then covering the halves with plaster gauze strips, filling them with expandable foam and then glue both and finally sand the foam until the shape I want.
Got mixed feelings ... Sad because with 1 euro I could have the fruits I needed for my projects and thus not needing to spend much money on material and "wasting" time until mine are not dried, but also relieved for the same reason! Eitherway, and having started a lemon during the morning, I decided to buy some to complement the ones I have already and maybe, just maybe, I'll end up by doing a foam cast from the plastic fruits.

From left to right: the apple I made, behind a still paper mache clay strawberry, up front a foam cast of an egg with a foam cherry behind, the foam cast of "my" apple and finally the plastic fruits. 

Thanks for visiting!