sexta-feira, 29 de julho de 2016

Late sixteenth century paper mache hat V

 Hi everyone!

 I'm back and with major advancements on my late 16th century hat!

 If you watched the latest post with a video, you heard me speaking about "stichings" and "embroidery".
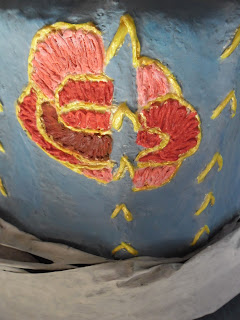
The idea was to give a sort of silk embroidered roses as sort of pattern. For that, as I did on the seams, I drew the roses and marked the outline also with "strategic" points in order to pierce the hat's body, ...
   then glued that very same outline and filled the inside (with thin rolls of toilet paper), ...
 and painted all with acrylic colours whilst trying to give a (extremely) rough 3D appearance.
Side view
Side view near the sash
Top view
Overview 


 The creme de la creme was covering the rest of the hat's body with liquid cold porcelain (ie water + white glue + starch) to ease the roughness of the toilet paper and then painting it with two coats greyish blue which matches wonderfully with the (finally) gilded seams and roses outlines). Have a look!
  I'm still wondering if to make a cut between the seams to give the idea that they are two pieces of cloth stitched together and also to varnish the roses, but... once the hat is almost finished, I've also added the "pompon" on the sash, am already designing some jewels and planning the feathers.

 Soon enough all will be finally finish! You will want to see it, right? So follow me either on this blog or through facebook, twitter @ https://www.facebook.com/MachePte

Thanks for visiting! :D


sexta-feira, 22 de julho de 2016

Late sixteenth century paper mache hat IV


News with the late 16th century hat!


Thanks for visiting, following, subscribing :)

domingo, 17 de julho de 2016

My paper mache Apple

Hi everyone!

Today I'm posting something which I've finished today and... for the first time in my life its a non pretentious sculpture (not that I'm pretentious, I'm just a Leo from July) - an apple!

I made a search online upon similar projects and I saw one in which a real apple was used, covered with paper mache and flour glue, cutted in half, re-assembled and painted. Its alright, right? But not for me, I utterly love the construction process, the seeing and wondering about the object, so I had to start from scratch!

Basically I took a small balloon as armature and then played a bit with volumes through adding strips of cardboard whilst covering it up with my paper clay recipe.
As finishing layer I used liquid cold porcelain, sanded a bit some edges and simply painted with acrylic, voilá!

Enjoy :)
(clic on the picture to enlarge and then clic again and press "view image")

Thanks for visiting :)

sexta-feira, 15 de julho de 2016

Late sixteenth century paper mache hat III

Hi everyone!

From piss pot to flan, what comes next?

So I was playing with the paper clay (with already white glue), decided to re-work the top and insisting on a fairly noticeable sort of "hump" I added a cardboard donut shape, ...
... covered again with more paper clay and also redesigning what I'm planning to be some side seams with thin rolls of toilet paper. 
Out of a sudden the sash apeared!!!
The sash actually is a huge strip of paper that came inside a package from some stuff my twin flame bought online (no, not from etsy!).  Thought that if I'd roll it around above the brim could give a lovely sash and I wasnt wrong, right? Then just soaked in liquid porcelain (white glue + starch) to keep the shape.

With the top finished I noticed how some bits on the sides were crooked so took a knife, made some adjustments, enhanced some of the toilet paper rolls (aka future seams), finishing by covering all with toilet paper and very watery wood glue.
 
Now that all of the making is finished, its time to start thinking about painting, sash decorations, possible jewels and plumes (real ones or paper mache? Humm....), yey!

Thanks for visiting! :)

Paper clay recipe II - the refreshments

Hi everyone!

So I was applying my paper clay paste onto the hat some days ago and it sinked after dried. Sad isnt it?
But not for long because afterwards I decided to add a bit of white glue to the mix and the results have been awesome!

Do keep visiting and following, soon I'll post the ongoing hat, the apple and who knows what else!

Thanks ;)

domingo, 10 de julho de 2016

I'm on ArtFinder too!

Hi everyone!

I dont want to deviate myself much from paper mache but, well, last week someone introduced me to a site called ArtFinder.com and it's an awesome site! I've been feeling much cozy (and cheaper) there than on Etsy as this second one is - seems to me - more for general hand made stuff (where apparently crochet and jewelry rule).

Not just wanting to share this with you but, and as you might know that I also make my paintings on paper mache canvas, today was paper mache canvas making!
Knowing exactly what I'll paint on these, please VISIT, FOLLOW or BUY @ http://ArtFinder.com/PeDro

Thank you!

Paper clay

Hi everyone!

Even before starting working with real clay (or terracota) my dream has been to find a real good modeling paste that its easy to make, doesnt have much chemicals inside and thus I can stur with my hands, doesnt get sort of rubbery (so flour or starch are no no material) , doesnt need to be cooked, doesnt crack whilst drying, doesnt take too much time to dry, doesnt leave lumps in the end, doesnt "gain" mold after a while (so flour or starch are no no material even if treated or mixed with something to prevent (I tried!)) .

Up until now and even after lots of research online, couldnt find one that really suited me. For the faces of my dolls (@ myroyaldolls.wix.com/myroyaldolls) couldnt possibly allow any type of wrinkle, lump, etc, so faces and hands are (and I guess will always be) air drying modeling paste which I can get from shops (rather cheap). For the structures have newspaper and white glue, cardboard if necessary and for some small fillings I normally use toilet paper and glue.

If you watched the previous post about a hat making you read that I have been using "paper clay" to fill and re-shape it.
This paper clay is extremely easy to do and here's the "recipe":

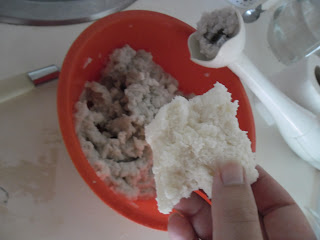
First I grab some toilet paper and soak it on water:
Then I rinse, say, 70% of the water and add a coffee spoon full of oil (just frying oil from the kitchen) and glue.
The glue I use to make the clay is paper glue that normally comes like flakes, so basically its like putting icing sugar on strawberries (yummy!!)
I live on a rather humid athmosphere so the flakes sort of became like shewing gum, but as I cant afford to throw such precious material to the garbage, I still use it anyway
Then use a mixer to blend all together.

Now, because it has already the glue mixed and I dont want to throw away the "juices" but at the same time the paste is still too wet I keep on adding toilet paper and mix, adding and mix until it reaches the consistency that I want.
It might not look much but once thik and with a fair amount of glue it can be a great paste to play with although I tend to use it only when I need to fill in big areas or shape large sculptures like horses, folds on some doll's skirts, or... hats!
The drying time obviously depends upon how thick the applied layer is, so... lets say, something with around 1 centimetre can take 2 to 3 sunny days to dry!

Hope you enjoyed and... now its time to have some fun, allez! ;)


Late sixteenth century paper mache hat II

Hi everyone!

So where were we? Ah yes, on the last post I told you I had put paper clay to reshape the hat and was reshaping it with toilet paper, right, so here's a photo of it and let me show you how this adventure has been until now:
As you can see I basically worked mostly on the top. Also, on my previous post I said that there was lots of lumps that needed to be corrected but what I didnt noticed much was that whilst drying the paper clay had shrinked a bit so whilst working on the top I had to re-cover it with lots of toilet paper and glue as well as on some of the sides.

Trying to find the best solution to make the sash around the brim, I had seen a picture of a hat that looked rather cilinder and seems as if the top was just covered with some fancy cloth that was attached to the brim thus making some funny vertical folds (actually its photo is on my previous post) all over and I tried that too with some thing rolls of toilet paper.

Still without any ideias upon how to make the sash, I was able to find a few more examples of these kind of hats online and... once again felt that the edges on the top were too "rigid" whilst on the original ones are rounder  so without further ado, and whilst keeping the fake folds, I did cut them in hopes of re-shaping its top sharp cilinder shape ...

And after repairing it with toilet paper and glue it looked like this (oh yes, added some sort of button shaped... "thing"):
Still not happy with the flat top top and still some mishapes within the sides I decided to add more paper clay (still no sign of the sash though!) and this is how it looks today, already dried:
Which means that if before it looked like a piss pot, now looks like a flan! LOL

Fingers crossed, lots of patience and I'll keep you posted about how things develop!

Thanks for visiting!


quarta-feira, 6 de julho de 2016

Late sixteenth century paper mache hat I

Hi everyone!

If you watched my latest video/post you heard me talking about the idea of making paper mache sort of epoch props to use on video presentations of my historical doll collection (myroyaldolls.wix.com/myroyaldolls).

Even before finishing the elizabethan paper mache ruff, I've started to study and doing a late 16th century top hat.

We commonly see these sort of hats on the portraits of King Philip II of Spain. I also found out that they were fashionable not only in Spain but also in England and France as its also common to see King Henri III wearing them.


 Hats like these, the forefathers of the mid 19th century top hats, were fashionable until mid 1600s until being deposed by the so called "cavalier" hat (and then the tricorn, etc etc etc) 

So let me show how I've been doing until now.


I've cut a strip of cardboard and stapled it according my head's measurements. Having that defined I've then placed the sort of "crown" cardboard thing on a big cardboard board, drew the head hole, drew the brim and glued both with paper mache.

For the top bit I wanted a sort of conical shape, not straight straight up so... I imagined that if I'd cut a smaller circle and attach strips of cereal box cardboard upwards it would do.

Then started to glue strips of newspaper all around those to make the upper body ...
and the result was this:
Quite disgusting right?! Thats what I thought too! 

After counting until 5 and some deep breaths, thought "okay, they also had sort of puffed hats, one sees lots amongst Elizabethan portraits of nobles, right?"

Whilst trying to convince myself, I ended up buy destroying that shitty thing! It wasnt really what I wanted so I sat, maybe had some tea and tried again! (having the energy to destroy something that really doesnt resonate with what one expects is a great feeling, dont you agree?)

What I ended by doing wasnt much different from before, basically I drew a sort of "wall" out of strips of cereal cardboard and glued them to the upper disk (which was saved from going to the garbage from the previous atempt). And ended up with this:


So glued from the top downwards (instead of upwards) I then glued the above seen onto the other part of the hat and left it to dry overnight.

Much more pleased with the result, the next day I started to glue some strips of newspaper not only to secure it but also to strenghten the whole thing, ending with the hat looking like this:
As one can see, the cereal cardboard inner structure is still very noticeable so I thought either to re-model it in toilet paper or paper clay. By one hand toilet paper dries alot faster but needs lots of it, by the other hand paper clay does fills lots at once but takes ages to dry!

What to choose?

Still had some paper clay from having sketched a horse and its been ages that I didnt used it, plus thought it would be a good excuse, whilst the paste would dry on the hat, that I could dive either carrying on with older projects (like the royal coat of arms!!!) or start a new one ...

So I chose the clay, went up making more and covered the hat!
Ending up with this (3 to 4 days after)
To finish today's post I'll tell you that since last night and today's morning, because even after applying the paper clay, the hat had lots of lumps, lacks and misshapes, I have been re-shaping all with toilet paper and wood glue (my normal paper mache technique) :)

Hope you liked, please share your thoughts and do follow me/the blog as 'll keep posting whatever goes on on my mind / hands / studio!

Thanks for visiting!


segunda-feira, 4 de julho de 2016

I thus present you my finished paper mache Elizabethan ruff!

Hi everyone!

Yeap, finally its finished ruff posting time, so here's my video on my newly created paper mache related youtube channel (do subscribe, soon there will be more vids ;)


 Do let me know if there are some unanswered issues, suggestions, etc.

Thanks for visiting!